Welcome back... And we continue from the white paint on the main body and detail of the Saturn 1B.
Now we move on to the Apollo Capsule. This kit is also sold alone by Semroc and also as the capsule for their Little Joe kit.
The Apollo Capsule kit is itself a Skill Level 4 kit.
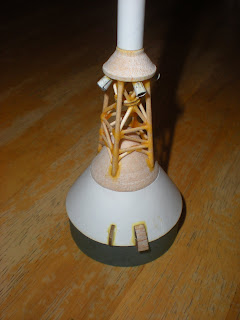
You start by gluing together the escape tower motor unit and command module. Then comes the fun and tedious work.... Building the tower itself.

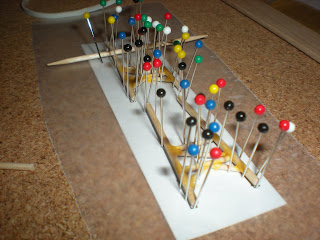
It takes a lot of pins and patience. I used a cork bulletin board, putting a layer of wax paper over the pattern before pinning and gluing the pieces together.
The supplied tiny dowels have to be sanded to the correct diameter. This takes quite a while and a lot of care to make sure the diameter stays uniform as you are sanding them down.


Paper jigs are used to stand the upper and lower "V" strut assemblies together. This holds them in the correct position as the glue dries.
I worked on the tower sides and "V" strut assemblies at the same time. They both were dry at the same time and then I was able to put it all together. have patience and let each stage dry thoroughly before moving on to the next. As long as you are very accurate and measuring your lengths and angles of cut, you should be good to go when gluing the various assemblies together.


While the escape tower is drying you assemble the four escape motor nozzles. These are made from pieces cut from the same sheet that the capsule shroud came from. these are glued and twisted around the sharpened end of a pencil to get their shape. Not quite as easy as it would seem.
Before assembling all these components, you should use filler coat and sanding sealer on the nose cone until you have all the tiny wood grain and holes in the balsa filled in. This will give you a nice flat, slick surface to prime and sand for painting.
Unfortunately I went straight on to assembly and primering and skipped the filling and sealing... It was my one moment of weakness where I became impatient during the construction that spread over three months.


I had to try on the capsule for fit. You start to get excited at this point because the model is really taking shape.


I went on to primer the capsule. The kit did still turn out very nice and I am the only who has made comments about not filling all the tiny holes, but...


I painted the capsule white and then went on to finish the silver details on the rest of the model. And last but not least, I applied the waterslide decals, sealing them over with a thin coat of Future floor wax painted on with a fine haired brush for protection. The wax was applied only after the waterslide decals had set for at least one day.


And Voilà a Saturn 1B!


3 comments:
Wow and Wow! What amazing detail. Such a wonderful and educational project for the whole family. When is flight day? Or, after all of the tedious fine work is it going to be a hangar queen?
We are actually going to fly it. I will definitely be careful packing the chutes for this one. We should be flying it at a rocket launch for the Sonoran Science Academy here in Tucson where Alan and Brenda attend. We would also like to fly it out at Desert Heat 2009. If it flies real well then we will fly it occasionally. If something drastic happens, then I will probably repair it and park it in the hanger. :-)
Well we did fly it out at Desert Heat 2009. That was our first 4 motor cluster, so we were kind of on pins and needles, crossing our fingers. We used a four igniter clip whip that I had whipped up that morning. Great test for Alan's Launch Box and... It was an awesome, perfect flight! All four motors lit and we had a beautiful flight and both the capsule and rocket were recovered without any scratches at all. :-)
Post a Comment