We have been using the small 6 volt Estes controllers for years with no complaints. These handy little controllers are lightweight, are powered by 4 inexpensive AA batteries, have continuity lights, a safety "key" and have never failed us... launching rockets with single motors. The only problem we have ever had with them has been launching rockets with multiple motors. These groups of motors fired at the same time at lift off are referred to as clusters or clustered motors.
We built two Estes 36 D Squared rockets that have been really fun to fly. The problem has been that we have had only about 50-66% success rate using the Estes controller with four AA's.
I had came across a posting online someone who had built his homemade launch controller out of a regular toolbox. It was a very good article and he graciously explained what he had done and the evolution of his box. I will put a link to that article at the end of this entry to give credit where it is due.
I had Alan read the post and start working on his own schematic of what his circuit would look like building a box for 4 launch pads. This was his original drawing.
After his hand drawing he made another version in Microsoft Visio. After we had the basic idea of what we wanted, we headed to the store(s) multiple times. As with most projects like this you don't quite have everything on hand and you learn a lot as you go.
First we picked up a toolbox for about $10 at Wal-Mart and a 3/8" thick piece of good quality wood from Lowe's. We cut the wood with a jigsaw to fit the inside dimensions of the toolbox so that the piece could sit in where the tray would normally go.
Most of the electronic parts came from the local Radio Shack store. We did make multiple trips to Ace Hardware for electrical connectors because the selection was better and they had larger packages. (If they have what you are looking for, Home Depot and Lowe's are usually cheaper for the connectors) The universal automotive starter switch that we use for the Master Safety switch was $9.99 from Pep Boys Auto.
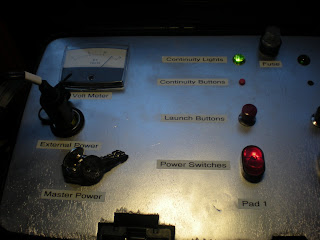
We laid out the board and marked it where we wanted the switches to go. Below is the original layout with the lighted fuse holder near the Master Power Switch. This was later moved to the left of the pad power switches and then later to it's final position up top. This was because of clearance issues with the built in storage trays in the lid. It also shows the Continuity switches which were later removed. We primered and then painted the board with an Aluminum colored paint.
We used regular outlet switches for plugging in the launch cords that run out to the igniters. We used 14 gauge outdoor extension cords that we picked up at Wal-Mart. We also made a couple out of some 16 gauge cords we already had on hand. We bought 50 foot cords and cut them at 35 feet from the male end. We then stripped the remaining 15 foot to harvest the 14 gauge wire for wiring the box inside. This ended up much cheaper than buying bulk 14 or 16 gauge wire. We could get an extension cord and the extra wire we needed for the same price or lower than buying just the bulk wire for the insides..
One thing we did include was a 0-15 Volt DC meter from Radio Shack. They didn't carry it in the local store, but they ordered it for us and it arrived in just a couple days with no shipping cost. It was $12.99. Shown below is soldering the resister for this meter inline and then covering it with heat shrink tubing.
We then wired up most of the circuits to test. We used alligator jumper wires on some paths just for the tests.
After several tests and not liking the tiny wires on the original continuity lights we had installed, we decided to go with some standard size bulbs as recommended for 12 volt launch systems in G. Harry Stines's book. Make sure to use Type 53 bulb for a 12 volt system. (You should use a Type 47 bulb for 6 volt sytems like the Estes controller) We had to make the holes a little bigger, but were very happy with the results.

We ran tests with live igniters and quick shorting tests to see what kind of current we were getting from the new system using a 12 volt automotive jump start system as opposed to 6 volts from AA batteries.
All the continuity circuits/lights worked great without lighting the igniters. The igniters fired flawlessly with the launch circuit.
The results were great. We had 1/2 the current on the continuity circuit of the new box as opposed to the Estes controller and more than 5X the current on the launch circuit. The results from Alan's report are below. Another change we made was eliminating the continuity test buttons from the circuits. It was really unnecessary and just added expense and an extra step to launch procedures. Now if you arm the master and a launch pads power switch the continuity light is already showing whether the circuit is complete or not. If your igniter is connected properly, then you should be getting a green light.
We have had zero failures launching clusters of 2 engines with this new controller. We hope to be testing our Semroc Saturn 1B on four motors and up to the full seven motors on our Semroc Hydra VII here in the near future. We will be sure to report back on how that goes.
Credits: Great idea of using a toolbox, layout and the automotive starter switch from Scott Fintel in his post at http://www.thefintels.com/aer/launchcontroller.htm.
Our final parts list:
1 - Stanley tool box - Wal-Mart
1 - Good quality wood board -Lowe's
1 - 0-15 Volt DC Meter from Radio Shack (22-410)
1 - 12 Volt Car Accessory Outlet - Radio Shack (270-1556)
1 - Universal Automotive starter switch from Pep Boys (85936)
1 - Lighted Fuse Holder - Radio Shack
4 - Continuity Lights - Radio Shack (272-325)
4 - Launch Push Buttons - Radio Shack (275-609)
4 - Lighted Rocker Power Switches - Radio Shack ( 275-712)
4 - 14 Gauge Extension cords - Wal-Mart
2 - Wall Plate Covers - Wal-Mart
2 - Wall Receptacles - Wal-Mart
1 - Black & Decker 12 volt Jump Starter/Air Compressor - Wal-Mart
We also used many connectors and heat shrink tubing from Ace Hardware, Radio Shack, Lowe's and Home Depot. The microclips that we used for our clip whips were also from Radio Shack.
I will do another post later on the quick disconnect clip whips that we made and are using with this launcher.


1 comment:
Spectacular post! Great description, instructions, AND photos!
You should consider posting this on instructables.com.
Excellent!
Post a Comment