Wednesday, February 25, 2009
KVM Fin Holder
Many rocketeers create ingenious jigs, measuring tools and other devices that make building rockets much easier with better results. We also find things that are already available around the house, office or shop to use in our sky bound pursuits.
I use one such device in my office enough that I decided to put in a quick post.
At my desk I have a KVM (Keyboard-Video-Mouse) switch that I use to switch between 1-4 computers. I have my work machine on one channel, my home machine on another, a docking station on one for the laptop and another for an extra set of cables under the desk. That is for connecting family and friends' computers that make their way over from time to time for troubleshooting.
Anyway, the space between the D-Sub connectors in the back works perfectly for holding up to four fins in an upright position while glue sets up a little. The steps I usually follow are below.
1. Mark fin and launch lug lines on body tubes.
2. Mark the very end of the tube at the fin and launch lug lines. (This is for sighting as you are lining the fins up, especially if the fins are glued clear up to the edge.)
3. Put a bead of glue on one of the fins root edges and then use that to apply a line of glue to each line on the body tube where the fins will be glued.
4. Put another bead of glue on that fin and stand it up in the KVM switch.
5. Do the same for the other fins.
6. After about a minute of setting time, start attaching your fins. If need be, you can put another small bead of glue on the root edge if it has set too much.
7. This technique allows for good strong bond and makes it easier to put all fins on one right after another for good alignment.
8. When they are all on, stand the tube on its end with the fins up.
9. Sight down each fin and make sure they are lined up properly and check for uniformity in relation to each other. They should all be sticking out perpendicular to their attachment points.
10. Once they are all set fine, let they dry strong and then come back and apply your fillets to the fin joints. On smaller rockets I only apply the fillets once, but on larger rockets that use higher impulse motors, I may make several layers to the fillets till I achieve the size and shape I want.
Hope this helps for any computer geek/model rocket engineer that may have a KVM at their desk.
I also use Titebond II for all of my rockets that fly on A-E motors. This sets faster and is easier to work with than Elmer's/white glue. I also buy a large 32 oz or larger container and refill the small 4 oz bottle I use for actual gluing. This saves money on glue and is very convenient. For the high powered rockets I am using an epoxy.
Monday, February 23, 2009
Semroc Saturn 1B - Part 2
Welcome back... And we continue from the white paint on the main body and detail of the Saturn 1B.
Now we move on to the Apollo Capsule. This kit is also sold alone by Semroc and also as the capsule for their Little Joe kit.
The Apollo Capsule kit is itself a Skill Level 4 kit.
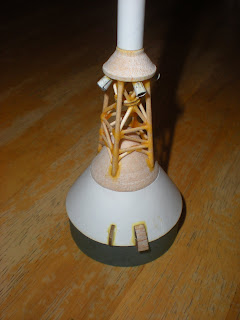
You start by gluing together the escape tower motor unit and command module. Then comes the fun and tedious work.... Building the tower itself.
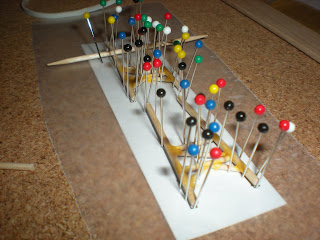
It takes a lot of pins and patience. I used a cork bulletin board, putting a layer of wax paper over the pattern before pinning and gluing the pieces together.
The supplied tiny dowels have to be sanded to the correct diameter. This takes quite a while and a lot of care to make sure the diameter stays uniform as you are sanding them down.
Paper jigs are used to stand the upper and lower "V" strut assemblies together. This holds them in the correct position as the glue dries.
I worked on the tower sides and "V" strut assemblies at the same time. They both were dry at the same time and then I was able to put it all together. have patience and let each stage dry thoroughly before moving on to the next. As long as you are very accurate and measuring your lengths and angles of cut, you should be good to go when gluing the various assemblies together.
While the escape tower is drying you assemble the four escape motor nozzles. These are made from pieces cut from the same sheet that the capsule shroud came from. these are glued and twisted around the sharpened end of a pencil to get their shape. Not quite as easy as it would seem.
Before assembling all these components, you should use filler coat and sanding sealer on the nose cone until you have all the tiny wood grain and holes in the balsa filled in. This will give you a nice flat, slick surface to prime and sand for painting.
Unfortunately I went straight on to assembly and primering and skipped the filling and sealing... It was my one moment of weakness where I became impatient during the construction that spread over three months.
I had to try on the capsule for fit. You start to get excited at this point because the model is really taking shape.
I went on to primer the capsule. The kit did still turn out very nice and I am the only who has made comments about not filling all the tiny holes, but...
I painted the capsule white and then went on to finish the silver details on the rest of the model. And last but not least, I applied the waterslide decals, sealing them over with a thin coat of Future floor wax painted on with a fine haired brush for protection. The wax was applied only after the waterslide decals had set for at least one day.
And VoilĂ a Saturn 1B!
Saturday, February 14, 2009
SpaceShipOne - An Illustrated History by Dan Linehan
We had the opportunity to meet Dan Linehan today at the Pima Air and Space Museum in Tucson. He was there to give a presentation on his work on the book.
It was very interesting and we learned some more details that we had not heard before. If you are ion Tucson yourself, you can still pick up a signed copy of his book from the Barnes & Noble bookstore on East Broadway. It is an excellent history with great photos of the project and vehicles.
Below are some pictures from our visit to the museum.
Dan was happy to answer people's questions and was very gracious to sign people's copies of the book.
February 14th, 2009 - Duane, Naomi and Alan with Dan Linehan, Author of SpaceShipOne.
Dan did a nice presentation and we highly recommend the book.
An SR-71 Blackbird. This is an impressive bird to see.
A "Supper Guppy" that was used to transport Saturn V boosters.
The Air Force One used by Presidents Kennedy and Johnson.
The mueums diorama of a V-1 launch site.
Our own Estes SpaceShipOne model that we built and has made two successful flights. This one uses parachute recovery, but we would someday like to make one that uses glider recovery. This kit comes with some interesting jigs that help glue the "wings" in there proper position on the body tube.
Subscribe to:
Posts (Atom)